Article Guide
Use these jump points to move through the article faster.
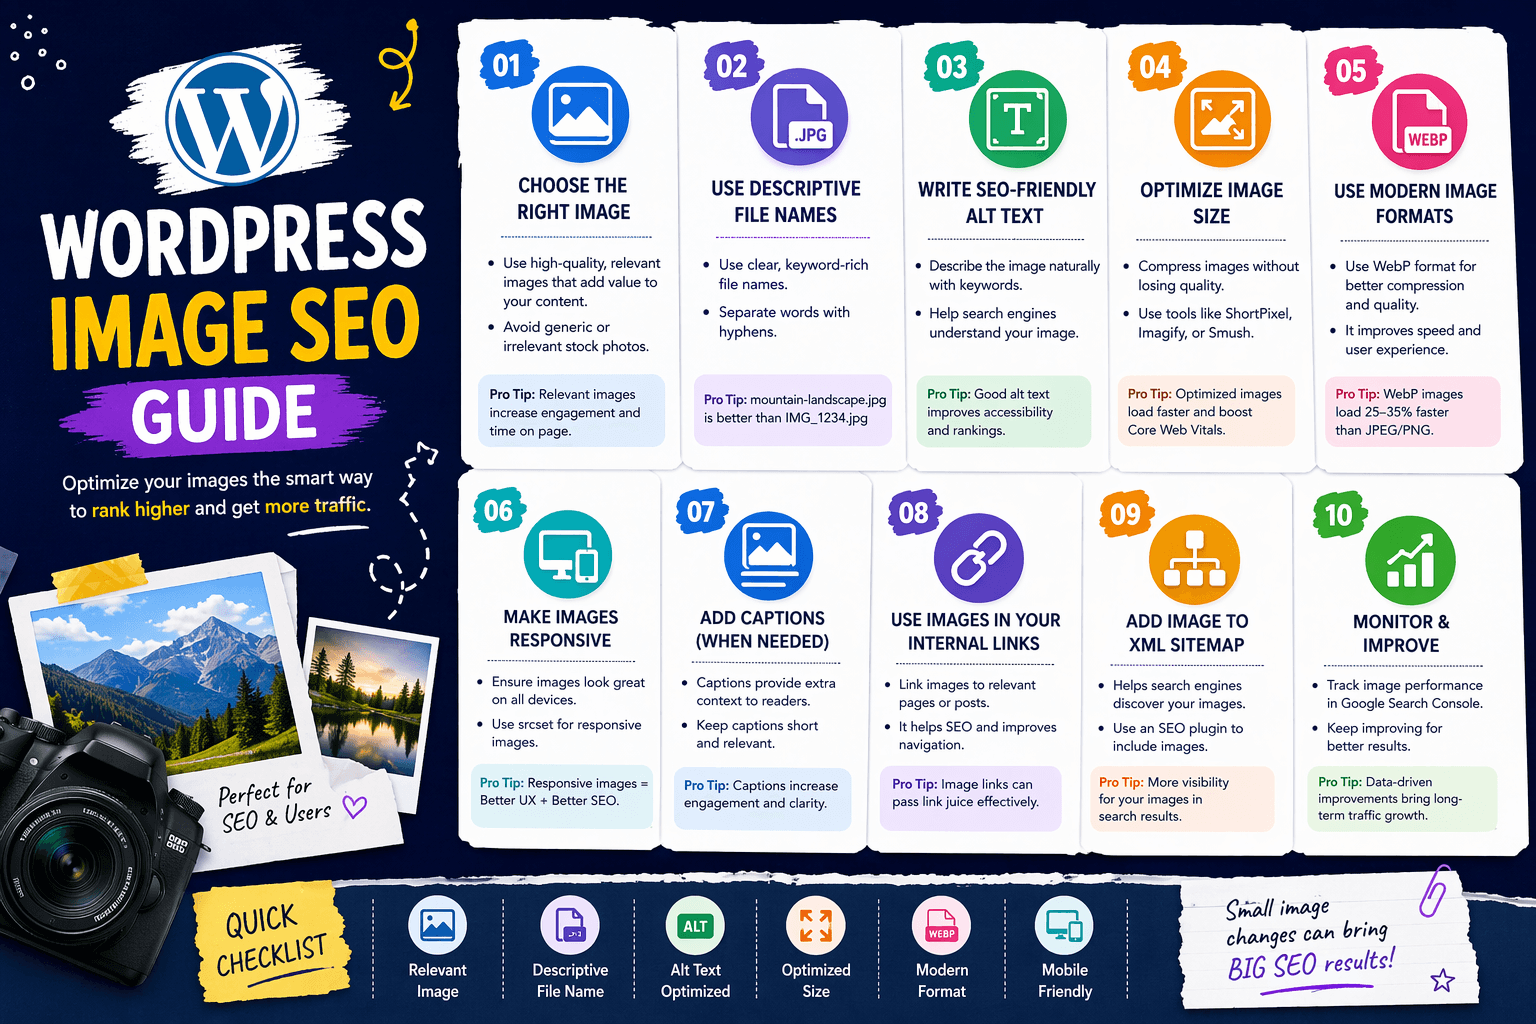
Images are the most consistently underoptimized element on WordPress sites. Most site owners upload an image, maybe add a title, and move on — leaving a significant amount of both search visibility and page performance on the table. Done correctly, image SEO in WordPress serves two goals simultaneously: it helps your images rank in Google Image Search (a source of real traffic for visual content), and it ensures those images load fast enough to support your Core Web Vitals scores rather than undermining them.
In 2026, the performance dimension of image SEO matters more than ever. Google’s Largest Contentful Paint (LCP) — the measure of how quickly your main visible content loads — is frequently determined by your hero or featured image. An unoptimized image that weighs 3MB and has no dimensions defined doesn’t just slow your page; it actively suppresses rankings by failing Core Web Vitals thresholds.
This guide covers every aspect of WordPress image SEO: alt text, file naming, image formats, compression, sitemaps, lazy loading, structured data, and how to audit and fix image issues across an existing content library.
Part 1: Why Image SEO Matters for WordPress Rankings
Image SEO contributes to your WordPress site’s search performance in three distinct ways:
1. Google Image Search Traffic
Google Image Search is a significant traffic channel that most WordPress site owners never specifically optimize for. When someone searches for a visual topic — product photos, infographics, tutorial screenshots, food photography, design inspiration — Google surfaces image results from across the web. Sites with well-optimized images (proper alt text, descriptive file names, image sitemap submission, relevant surrounding content) appear in these image results and receive direct referral traffic from image searches.
For certain content types — recipes, product photography, infographics, portfolio sites — Google Image Search can be a substantial portion of total organic traffic. For blog and business sites, it’s a secondary channel worth capturing without significant additional effort.
2. Page-Level Ranking Support
Images contribute to a page’s overall relevance signals. Alt text, file names, captions, surrounding content, and image title attributes all give Google additional context about what a page covers. A post about WordPress image SEO that includes screenshots with alt text like “WordPress media library showing alt text field” is sending stronger topic signals than the same post with images labeled “screenshot1,” “screenshot2.”
Additionally, image quality is increasingly factored into Google’s overall page quality assessment — blurry, irrelevant, or visually poor images can be a negative quality signal on pages where visual presentation matters.
3. Core Web Vitals and Page Performance
Unoptimized images are the single most common cause of Core Web Vitals failures on WordPress sites. They directly impact:
- Largest Contentful Paint (LCP): If your hero or featured image is the largest visible element on the page (which it usually is), its load time IS your LCP score. An uncompressed JPEG hero image at 2.5MB produces an LCP of 3–5 seconds — well into the “Poor” range that Google penalizes in rankings.
- Cumulative Layout Shift (CLS): Images loaded without explicit width and height dimensions cause content around them to shift as they load — directly contributing to CLS score violations.
- Time to First Byte (TTFB) and Total Blocking Time: Large numbers of unoptimized images increase server response time and total page weight, slowing every user interaction downstream.
Part 2: Image Alt Text — The Foundation of WordPress Image SEO
Alt text (the alt attribute on HTML <img> tags) is the most important image SEO element and the most consistently neglected one. It serves two purposes: accessibility (screen readers read alt text to describe images to visually impaired users) and SEO (search engines read alt text to understand what an image depicts when they can’t visually interpret it with certainty).
How to Write Effective Alt Text for WordPress Images
Be specific and descriptive: Alt text should describe exactly what’s in the image, not what you wish the image was about. Write as if you’re describing it to someone who can’t see it. “A graph showing WordPress site traffic increasing 280% over six months after implementing internal linking strategy” is better than “WordPress traffic graph” and far better than “graph.”
Include your focus keyword where natural: For your post’s featured/hero image, include the page’s primary focus keyword in the alt text where it genuinely fits the image’s description. Don’t force it — if it doesn’t fit naturally, don’t include it. For other images in the post, use related terms and synonyms where they accurately describe the image.
Don’t keyword-stuff: Writing alt text like “WordPress image SEO WordPress image optimization WordPress images” is detected as spam and provides no SEO benefit. Write for the human reader first. Useful, accurate alt text is good alt text — for both accessibility and SEO.
Don’t start with “image of” or “picture of”: Google and screen readers already know it’s an image. Starting with “A WordPress dashboard showing…” is cleaner than “Image of a WordPress dashboard showing…”
Keep decorative images blank: Images that are purely decorative — dividers, background patterns, abstract shapes that add no content meaning — should have empty alt text (alt="") rather than descriptive text. This tells screen readers to skip them and prevents Google from treating decorative content as meaningful image context.
Setting Alt Text in WordPress
In the WordPress block editor, click any image block and look for the “Alt text” field in the right sidebar panel. In the Classic Editor, click on an image after inserting it and look for the alt text field in the image dialog.
You can also set alt text retroactively for existing images in the WordPress media library: go to Media → Library, click any image, and fill in the “Alternative Text” field. This updates the stored alt text but does NOT automatically update already-published posts that reference the image — for those, you’d need to update the post itself.
Alt text checklist for each image:
- Accurately describes what is visible in the image
- Includes focus keyword for featured/hero image (where natural)
- Written in plain, readable language
- Unique per image — not the same alt text on multiple images
- Not blank (except for purely decorative images)
- Under 125 characters (screen readers typically cut off longer alt text)
Part 3: Image File Names — Set Before You Upload
The image file name is one of the signals Google uses to understand what an image depicts, particularly when crawling the image for the first time before other contextual signals are fully processed. WordPress uses the file name as the base of the image URL — yourdomain.com/wp-content/uploads/2026/04/your-file-name.webp — making it a permanent part of your image’s web identity.
The Golden Rule: Rename Before Upload
Once an image is uploaded to WordPress, its URL is set. Renaming the file after upload changes the filename stored on your server but breaks all references to the old URL throughout your content — every post, page, or widget that displays that image shows a broken image instead. The only safe time to set a correct file name is before uploading.
File Naming Best Practices
Format: lowercase-words-separated-by-hyphens.webp
Do:
- Describe the image content specifically:
wpmazic-seo-redirect-manager-dashboard.webp - Include the main keyword where accurate:
wordpress-image-seo-alt-text-example.webp - Use hyphens, not underscores or spaces
- Keep it under 5–7 words
Don’t:
- Use camera-generated names:
DSC04821.jpg,IMG_9021.png - Use dates without context:
screenshot-2026-01-12.png - Use generic names:
image1.jpg,photo.jpg,untitled.png - Keyword-stuff:
wordpress-seo-wordpress-images-seo-wordpress-image-optimization.jpg
Bulk Renaming Existing Images
If your media library already has hundreds of images with auto-generated file names, retroactively renaming all of them is not practical — the URL-breaking risk is too high on a live site. Focus on renaming correctly going forward, and for your highest-priority pages (top 10–20 by traffic), consider re-uploading new optimized versions of the hero images with correct file names and updating the post references.
Part 4: Image Format and Compression — The Biggest Performance Impact
Image file size directly determines how long images take to download — and download time directly determines your LCP score. For most WordPress sites, image weight is the single largest contributor to slow page loads. A hero image served at 2.5MB takes 5–10 seconds to fully load on a typical mobile connection. The same image at 120KB loads in under a second.
Choosing the Right Format
WebP (primary recommendation for 2026): Google’s open image format that achieves 25–35% smaller file sizes than JPEG and 60–80% smaller than PNG for photographic images, while maintaining equivalent visual quality. Fully supported by all modern browsers. For WordPress sites in 2026, WebP should be the default format for all images.
AVIF (next-generation, emerging): Even better compression than WebP — typically 30–50% smaller than WebP for equivalent quality. Browser support is growing (Chrome, Firefox, Safari 16+) but not yet universal. Consider it for images where compression efficiency is critical, with WebP or JPEG as fallback.
JPEG: Still appropriate for photographs as a fallback when WebP isn’t supported. Always compress JPEGs — aim for 80% quality in most tools, which typically reduces file size by 60–70% with minimal visible quality loss.
PNG: Use only where transparency is required (logos, icons with transparent backgrounds). PNGs are significantly larger than WebP for photographic content. If transparency is needed, WebP also supports it — prefer WebP over PNG in all cases where browser support allows.
SVG: For logos, icons, and simple illustrations, SVG (Scalable Vector Graphics) is resolution-independent and tiny in file size. SVGs scale perfectly to any size without quality loss — ideal for logos and icon elements used across your theme. Never use SVGs for photographs.
Setting Up Automatic WordPress Image Optimization
Manual image compression before every upload is impractical at scale. Use an image optimization plugin that handles compression and format conversion automatically on upload:
Imagify — One of the most comprehensive options. Compresses images on upload, converts to WebP automatically, offers three compression levels (Normal, Aggressive, Ultra), and includes a bulk optimization tool for your existing media library. Free tier compresses 25MB per month; paid plans from $4.99/month.
ShortPixel — Similar to Imagify with AVIF support in addition to WebP. Credit-based pricing means you pay per image rather than monthly. One-time credit packs available for bulk optimization of existing libraries.
Smush (WPMU DEV) — Free tier includes lossless compression and lazy loading. Smush Pro adds WebP conversion, CDN delivery, and no file size limits. Good option for users already using other WPMU DEV products.
After installing any of these plugins, configure it to:
- Automatically compress images on upload
- Convert to WebP format and serve WebP to supported browsers (with JPEG/PNG fallback)
- Run bulk optimization on your existing media library
Target File Sizes by Image Type
As a rough guide for what to aim for:
- Hero / featured images (full-width): Under 150KB in WebP
- In-content images (standard column width): Under 80KB
- Thumbnails: Under 20KB
- WooCommerce product images: Under 100KB per image
- OG/social sharing images: Under 200KB (1200×630px)
Part 5: Image Dimensions — Preventing Layout Shifts (CLS)
Cumulative Layout Shift measures visual instability — how much page elements jump around while the page loads. One of the most common CLS sources is images loaded without predefined dimensions. When a browser doesn’t know an image’s dimensions in advance, it can’t reserve the right amount of space for it in the layout. When the image loads, surrounding text and elements jump to accommodate it — causing a layout shift that Google measures and penalizes.
Always Define Width and Height on Image Tags
Every <img> tag should include explicit width and height attributes:
<img
  src="wordpress-image-seo-guide.webp"
  alt="WordPress image SEO guide showing alt text optimization"
  width="800"
  height="450"
  loading="lazy"
/>
WordPress 5.5+ automatically adds width and height attributes to images inserted through the block editor when those dimensions are known (i.e., the image has been uploaded to your media library and WordPress has processed its dimensions). This means images inserted through Gutenberg’s image block should have dimensions automatically.
Where you need to be careful:
- Images embedded manually in HTML in custom HTML blocks (add dimensions manually)
- Images added via page builders that don’t inherit WordPress’s native image handling
- Background images defined in CSS (handle via aspect-ratio CSS property)
- Externally hosted images (embed with explicit dimensions)
Use CSS aspect-ratio for Responsive Images
For responsive WordPress sites where images scale with the container, use the CSS aspect-ratio property alongside intrinsic width/height to maintain layout space across all screen sizes:
img {
  max-width: 100%;
  height: auto;
  aspect-ratio: attr(width) / attr(height);
}
This combination tells browsers: “I know the image’s natural proportions; reserve that proportional space in the layout while the image loads, regardless of the container width.”
Part 6: Lazy Loading — Speed Up Without Hiding Images
Lazy loading defers loading of images outside the viewport until the user scrolls toward them. This improves initial page load time by reducing the resources needed to render the above-the-fold content first.
WordPress Native Lazy Loading
WordPress 5.5+ applies loading="lazy" natively to all images inserted through the block editor. This is the correct default behavior for most images — they load progressively as the user scrolls, reducing initial load time.
The Critical Exception: Never Lazy-Load Your LCP Image
This is one of the most important and most frequently violated image SEO rules in WordPress. Your LCP element — the largest visible piece of content when the page first loads, usually your hero image or featured image — must load as quickly as possible. Lazy-loading it has the opposite of the intended effect: it delays the most important image on the page, directly worsening your LCP score.
For your hero or featured image, add fetchpriority="high" and either omit the loading attribute or set it to loading="eager":
<img
  src="hero-image.webp"
  alt="WordPress image SEO complete guide hero"
  width="1200"
  height="630"
  fetchpriority="high"
  loading="eager"
/>
In WordPress’s block editor, select your hero image block and in the Advanced panel, you can add custom HTML attributes. Some caching plugins and themes also have LCP image detection settings that automatically mark the first/largest image as high priority.
Check whether your LCP image is being incorrectly lazy-loaded by running your page through PageSpeed Insights. If it flags “Largest Contentful Paint element” and shows the image with loading="lazy", that’s the issue to fix immediately.
Part 7: WordPress Image Sitemap — Getting Images Discovered by Google
An image sitemap tells Google specifically about all images on your WordPress site — their URLs, titles, captions, and subject matter. This is particularly valuable for:
- Images loaded through JavaScript that Google’s crawler might not detect through standard HTML parsing
- Images embedded in complex page builder layouts
- Sites with large image libraries (photography, WooCommerce product photos) where exhaustive crawl-based discovery would be slow
- Providing image metadata (title, caption, license) that improves image search ranking signals
Setting Up Image Sitemap with WPMazic SEO
WPMazic SEO (both Lite and Pro) includes an Image Sitemap as part of its sitemap configuration. Images are automatically included in your XML sitemap when the feature is enabled:
- Go to WPMazic SEO → Sitemap Settings
- Enable the Image Sitemap option
- Configure which post types and image types should be included
- Your updated sitemap (at yourdomain.com/sitemap.xml or sitemap_index.xml) now includes image metadata
WPMazic SEO Pro extends image sitemap capabilities with additional controls: you can specify which post types contribute images to the sitemap, exclude specific image categories, and include additional metadata fields for better image search optimization.
Submitting Your Image Sitemap to Google
After generating your image sitemap, submit it in Google Search Console:
- Open Google Search Console → Select your property
- Go to Sitemaps in the left menu
- Enter your sitemap URL and click Submit
- Google typically processes image sitemaps within 1–7 days
After submission, monitor the Sitemaps report for any fetch errors. If Google can’t access your sitemap URL or finds XML format errors, it will show an error status with details about what went wrong.
Part 8: Responsive Images — Serving the Right Size for Every Device
WordPress generates multiple image sizes automatically when you upload an image — thumbnail, medium, large, and full — and uses the srcset attribute to tell browsers which size to load based on the display device’s resolution and screen width.
How WordPress Handles Responsive Images
When you upload an image, WordPress creates cropped versions at several size presets defined in your theme’s functions.php. When that image is displayed in a post, WordPress outputs a srcset attribute listing all available sizes:
<img
  src="image-800w.webp"
  srcset="image-300w.webp 300w, image-600w.webp 600w, image-800w.webp 800w"
  sizes="(max-width: 600px) 300px, (max-width: 900px) 600px, 800px"
  alt="WordPress image SEO responsive example"
  width="800"
  height="450"
  loading="lazy"
/>
The browser reads the srcset and sizes attributes and downloads only the most appropriate size for the current viewport and device — preventing mobile visitors from downloading a 2400px-wide desktop image on a 390px-wide phone screen.
Ensure Your Theme Declares Image Sizes Correctly
Some WordPress themes declare very few image sizes, which means WordPress doesn’t generate the intermediate sizes needed for efficient responsive delivery. Check in a theme’s functions.php whether it calls add_image_size() with appropriate sizes for your layout. A typical blog post column of 800px maximum width should have image size presets at approximately 400px, 600px, 800px, and optionally 1200px for high-DPI displays.
After changing image size settings, run the “Regenerate Thumbnails” plugin to recreate all your existing media library images at the new sizes.
Part 9: Featured Image SEO — The Most Important Image on Your Post
The featured image is the most SEO-significant image in any WordPress post. It appears: in your blog archive listing, in social sharing previews (via Open Graph), as the hero image at the top of your post, and typically as the LCP element that determines your page’s performance score. Getting featured image optimization right matters more than any other image on the page.
Featured Image Best Practices
Dimensions: Set your featured image at 1200×630 pixels. This is the standard OG image dimension that displays correctly when shared on Facebook, LinkedIn, Twitter/X, and WhatsApp. At this size, your featured image does double duty as both your on-page hero and your social sharing preview.
File format: WebP at under 150KB for the full-size version. WordPress will generate smaller thumbnail versions automatically from this source.
Alt text: Write descriptive alt text that includes your post’s primary focus keyword naturally. The featured image is typically the image most likely to appear in Image Search results for a post’s topic, so alt text optimization matters most here.
File name: Set a keyword-relevant file name before upload. For a post about WordPress image SEO, the featured image file name should be something like wordpress-image-seo-guide-2026.webp.
Load priority: Mark your featured image with fetchpriority="high" to ensure it loads as quickly as possible and doesn’t get delayed by the browser’s default resource prioritization. Many modern WordPress themes do this automatically for the first above-the-fold image, but verify in PageSpeed Insights.
Open Graph Image Configuration
WPMazic SEO automatically uses your post’s featured image as the Open Graph image (og:image) for social sharing. The plugin also offers a Dynamic OG Image feature (both Lite and Pro) that generates a branded social sharing image by compositing your featured image with your site’s branding — ensuring consistent, professional appearance when your posts are shared on social platforms.
Verify your Open Graph image is configured correctly by checking the Social tab in WPMazic SEO’s post panel — the og:image URL should reference your featured image at 1200×630px dimensions.
Part 10: Structured Data for Images — ImageObject Schema
For important images — particularly those you’re specifically optimizing for Image Search visibility — adding ImageObject schema provides Google with machine-readable metadata about the image beyond what alt text and file names communicate.
ImageObject Schema Fields
<script type="application/ld+json">
{
  "@context": "https://schema.org",
  "@type": "ImageObject",
  "contentUrl": "https://wpmazic.com/wp-content/uploads/wordpress-image-seo-guide.webp",
  "name": "WordPress Image SEO Guide 2026",
  "description": "A comprehensive visual guide showing WordPress image optimization settings including alt text, file naming, and lazy loading configuration.",
  "width": "1200",
  "height": "630",
  "author": {
    "@type": "Organization",
    "name": "WPMazic",
    "url": "https://wpmazic.com"
  }
}
</script>
For most WordPress blog posts, ImageObject schema isn’t necessary — your Article schema (which WPMazic SEO generates automatically) already includes an image reference. ImageObject schema is most valuable for:
- Photography portfolio sites where individual images are the primary content
- Product images on WooCommerce stores (included within Product schema)
- Infographics specifically created for image search visibility
- Recipe images (included within Recipe schema)
WPMazic SEO Pro’s Schema Builder handles ImageObject schema as part of its broader schema type support — you can add it to specific posts through the visual schema interface without writing JSON-LD manually.
Part 11: Auditing Your Existing WordPress Image Library
If your WordPress site has been running for a year or more, your media library likely contains hundreds or thousands of images with inconsistent optimization. A systematic audit identifies the highest-priority fixes.
Step 1 — Identify Images Failing Core Web Vitals
In Google Search Console, open the Core Web Vitals report and filter for “Poor” LCP URLs. These are your highest-priority pages — their LCP is almost certainly caused by an unoptimized image. Run each failing URL through PageSpeed Insights and look at the “Largest Contentful Paint element” diagnostic to confirm which specific image is the LCP element.
Step 2 — Bulk Optimize Existing Media Library
Run a bulk optimization pass using your image optimization plugin (Imagify, ShortPixel, or Smush). In the plugin’s bulk optimization interface, process all unoptimized images in your media library. This converts existing images to WebP and compresses them without changing their URLs — no post updates required.
Step 3 — Audit for Missing Alt Text
WordPress doesn’t have a built-in report for images missing alt text across your entire site. Options for finding them:
- Screaming Frog SEO Spider: Crawl your site and export the Images report. Filter for “Missing Alt Text” to see all images across your site that lack alt text, along with the pages they appear on.
- Google Search Console: The Coverage report doesn’t specifically flag alt text issues, but low image traffic in Google Image Search is a signal that your images aren’t well-optimized.
- WPMazic SEO’s SEO Analysis Dashboard: Flags missing alt text as part of its per-page SEO analysis — check your most important pages through the post panel analysis.
Prioritize adding alt text to your highest-traffic posts first, working through the library systematically from there.
Step 4 — Check for Incorrectly Lazy-Loaded LCP Images
Run your top 10 pages through PageSpeed Insights. Look for the “Avoid lazy loading images that are above the fold” opportunity or “Largest Contentful Paint element” showing a lazy-loaded image. Fix any hero or featured images being incorrectly lazy-loaded by adding fetchpriority="high" or removing the lazy loading attribute from those specific images.
WordPress Image SEO Checklist
Per-Image Checklist (Every Image You Upload)
- File renamed descriptively before upload (lowercase-hyphens.webp)
- Image compressed and converted to WebP (via optimization plugin)
- File size under target (hero: <150KB, in-content: <80KB)
- Alt text written (specific, descriptive, keyword where natural)
- Width and height attributes defined
Per-Post Checklist (Every Post You Publish)
- Featured image is 1200×630px WebP
- Featured image alt text includes focus keyword naturally
- Featured image has
fetchpriority="high"(not lazy-loaded) - All below-fold images have
loading="lazy" - OG image (og:image) verified in WPMazic SEO Social tab
Site-Level Checklist (Ongoing Maintenance)
- Image optimization plugin active and configured for auto WebP conversion
- Image Sitemap enabled in WPMazic SEO and submitted to Google Search Console
- Core Web Vitals LCP scores checked monthly in PageSpeed Insights and GSC
- Missing alt text audit run quarterly (Screaming Frog image report)
- Bulk optimization run on any batch of new uploads
- No images with incorrectly lazy-loaded LCP elements (PageSpeed Insights audit)
Image SEO is one of those areas where the gap between “what most WordPress sites do” (upload and forget) and “what you should do” (the practices in this guide) is enormous — and that gap represents real, capturable traffic and ranking improvement. Most of it is simple to implement once the habits are established. The alt text, file naming, WebP conversion, and dimension-defining practices described here take seconds per image when built into your publishing workflow.
The performance dimension — LCP optimization, lazy loading configuration, and CLS prevention — requires slightly more setup but pays dividends across every page on your site for as long as those images exist.
WPMazic SEO handles the infrastructure side: the image sitemap ensures Google discovers all your images, the Article schema generated on every post includes your featured image reference, and the Dynamic OG Image feature ensures every post has a properly formatted social sharing image automatically.
→ Get your WordPress images working for search visibility and performance. Explore WPMazic SEO — with Image Sitemap built in.